Powered by Blogger.

Tuesday, January 31, 2012

Kitchen Pantry Reveal


We have come to the end of the "Impossibilities Challenge" and I am excited to show you all my pantry. It is still incomplete, however. I have not yet changed out those ugly accordian doors. Remember these?:


Well, they're still there :-( But, I will be replacing them and can update you all when it is done. I have some fun things planned for the inside of the new doors, so I couldn't do that part yet. But, I did get a lot done and I am very happy with the results. So here they are:

Here was the before:


First, I painted the shelves with black chalkboard paint. Upon the advice (which I have since determined was horrible advice) of the Home Depot employee, I used spray chalkboard paint. He felt this would be the best way to paint the inside of a pantry or cabinet. Um, it was a mess. I taped off the walls, but as you can imagine, the spray paint did not really care about the taped off areas. So, there was a lot of paint everywhere. Like on the floor and even way outside the pantry into the rest of the kitchen. I was digging black paint out of my nose and ears for a couple of days too. Apparently, this problem should have been totally obvious. But, I was just doing what the Home Depot guy said. Don't they know everything? Lesson learned.

My wonderful husband primed and painted almost all the rest of the pantry for me after I nearly killed myself huffing paint while doing the shelves. The walls were painted in Swiss Coffee. Then, I put down some of that rubbery shelf liner stuff in a charcoal color.

I bought lots of dollar store baskets and painted them aqua, then attached chalkboard tags to label my baskets.

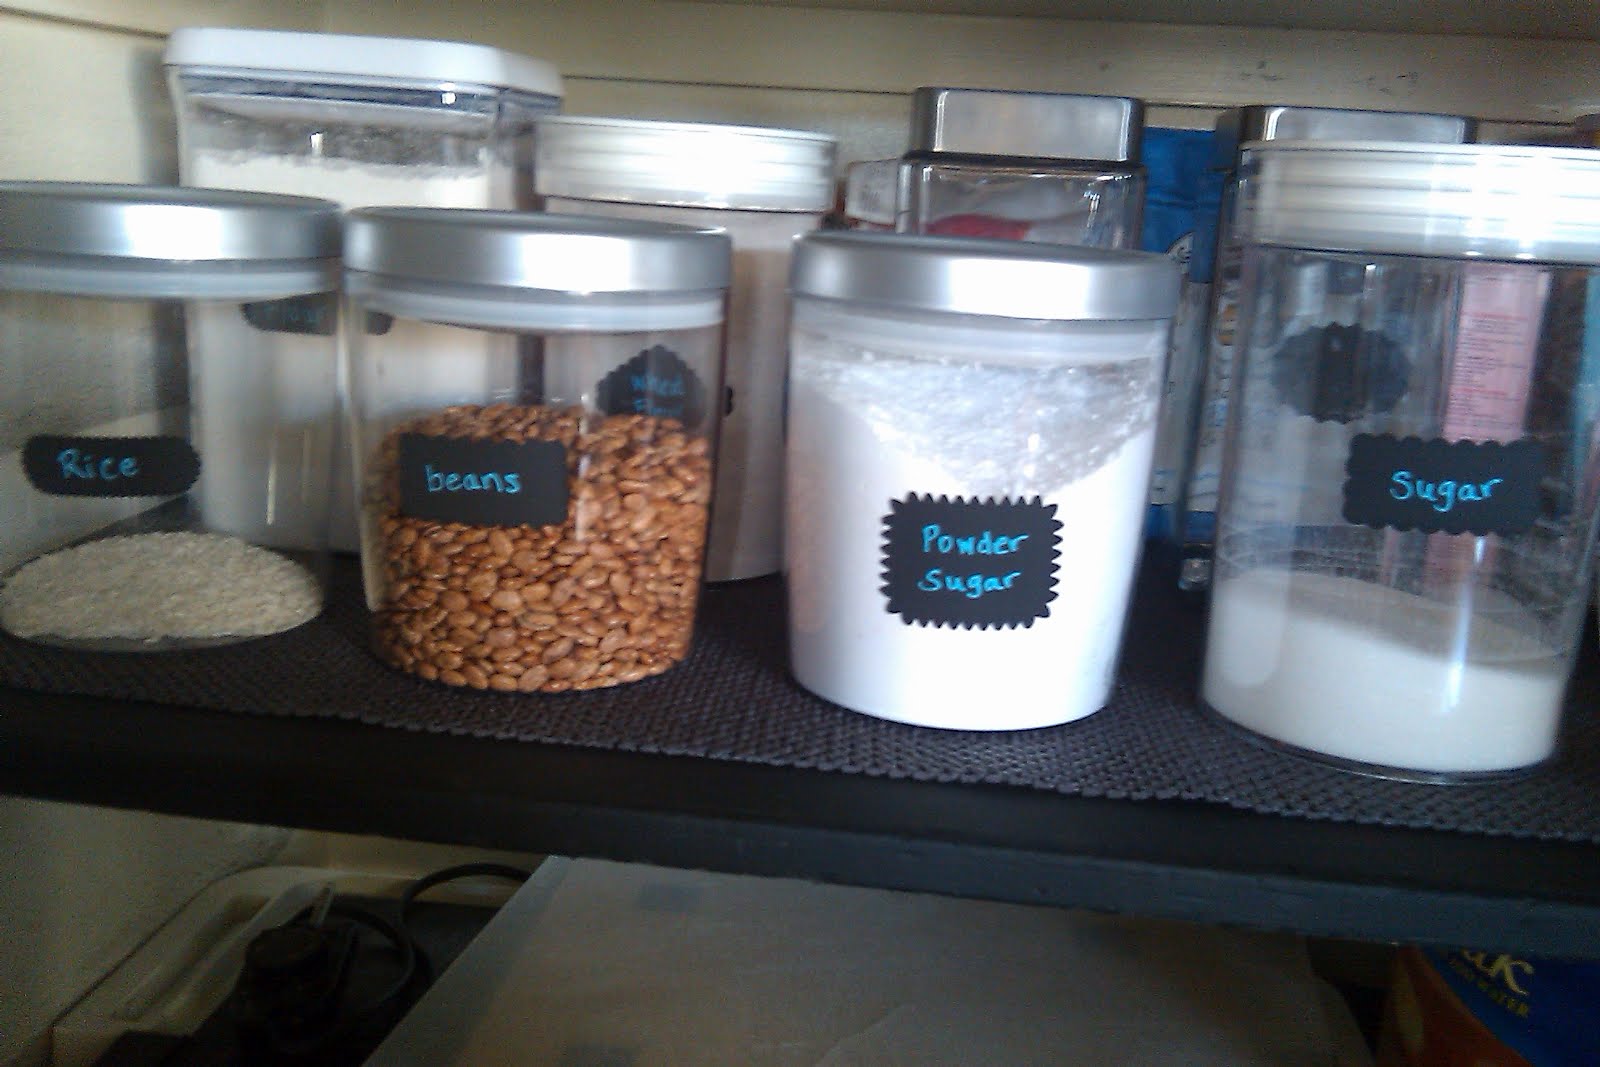
Next, I used some labels that I also painted with chalkboard paint to label my canisters.

I decorated a plastic grocery bag holder that I already had, put my cans on little shelves from Bed Bath and Beyond, my spices on a 2-tier lazy susan from Target and my foil/plastic wrap/wax paper et. al. in a hanging shelf from the container store.


I bought some inexpensive wicker hanging baskets from a flower shop in my neighborhood, spray painted them heirloom white and put my chocolate/peanut butter/butterscotch chips in one and packages of nuts in the other one:


I put an LED light from Home Depot on the ceiling:


The top shelf holds my bigger appliances, like my crock pot and coffee pot as well as a basket with coffee stuff (coffee, flavorings, coffee filters, coffee grinder and tea):


Also on the top shelf are my cookbooks:


The next shelf has my spice rack a small basket of garlic powder, salt and pepper (the things I use all the time), a basket of oils and cooking sprays:


The second shelf also has baking powders/soda, cocoa powder etc in one basket. There is an entire basket just for sprinkles (is that too much?) and a small basket with extracts and food colorings:


The 3rd shelf - 2 baskets of snacks (crackers, cookies, granola bars etc.) and shelves of canned foods:


Under the snack baskets is the hanging shelf that holds the plastic wrap, aluminum foil as well as boxes of pasta. Below the hanging shelf are 2 small baskets, one with dry mixes, one with jello/pudding boxes:


Beside those is a basket of boxed sides and next to that are all the canisters:


The bottom shelf has small appliances like my rice cooker, Foreman grill, little crockpot for dips and my griddle:


And on the floor, I have a box that holds my steam mop and swiffer accessories, another box that holds paper bags and a box of paper goods like cups, party napkins etc. These are ugly boxes that I plan to either cover up and make pretty or replace with some other type of basket or box:


And there we have it. Before:


After:


LOVE IT!


Linking up here:


Shine Your Light


Organize and Decorate Everything

Monday, January 30, 2012

Plastic Grocery Bag Holder


I'll be posting my big pantry reveal tomorrow. Yay! Ok, I am going to get this part out of the way right now: My doors are not finished. I really wanted to have those accordian doors replaced with regular hinged doors, but it didn't happen. But lots of really cool things did happen, so I will be sharing all of that very soon. And hopefully, very soon after that, I can show you my new doors too :-)

But for now, I am sharing a little pantry project I did. I have had this plastic bag holder since we moved into this house. The previous owners left it in the pantry. It was never hung up because, you know, that would require like 2 nails being hammered into the wall or something really strenuous like that. So, it sat on the floor for the last 7 years. Yes, I said 7 years! And as you can imagine, it's pretty useless on the floor. I actually thought I had gotten rid of it a long time ago. Then I found it when I was cleaning out the pantry for this "impossibilities" project. Um, yeah, that's how messy the floor was. I didn't even know it was down there.

So, here it is before:


I spray painted it with the chalkboard paint I used on my pantry shelves, then covered it with a piece of scrapbook paper, then put one of my chalkboard labels on it. Then I actually hung it up. It's so much more functional that way. Ta Da!

Monday, January 23, 2012

Impossibilities Challenge Update - Kitchen Pantry, Part II


Things are moving right along with my Kitchen Pantry project - shelves and walls have been painted, I have made some organizing baskets, added some lighting and labeled my canisters.

So, here is a peek at my canisters.


I love the look of the vinyl cutouts that I see everywhere


but I made mine with chalkboard labels instead.

I spray painted some Martha Stewart labels that I found at Michaels with chalkboard paint:


Then wrote on them with chalkoard ink and now I have this:


The one thing I do like about the chalkboard labels over the vinyl letter cut outs, is I can just erase and re-write if I change the contents of my canisters.

The last big thing to do is change out those accordian doors with regular hinged doors. I'm a little worried with just a week left in the challenge, if I will get this part done. Check back next week for the whole pantry reveal!


Linking up with these guys:


Pink Hippo Party


Creations by Kara


Organize and Decorate Everything


IhookedupwithHoHlamespice

Thursday, January 19, 2012

Valentine Tree


I have seen several of these little valentine trees all over blogland lately. My favorite is this one from Helping Little Hands:


The whole mantel is super cute and those crayon letters that spell "love" are genius. So, go check it out.

Ok, back to me.

I have had this empty white pitcher on my entryway table for, I don't know, 6 mos, maybe longer. Who really wants to keep track of those details anyway? The problem is that I have had this beautiful buffet table (craigslist score) for about that same amount of time and I have all these ideas floating in my head about how to decorate my entryway. Part of that involves painting the entryway and that is where it all falls apart. So, me being the way I am (and if you have read even a couple of my posts, you are learning that means all plan, no action), the beautiful buffet sits empty (with junk piling on top of it) until I can get the walls painted. I know it's stupid. I mean, just decorate and paint later, right? Right. It's 2012 people, I'm working on it.

So, back to my tree. It started with the branches. Oh, how I wish I had video footage or atleast a few good snapshots of the ridiculous "great branch hunt" my daughter and I embarked on for this project. I first went to the craft store to buy branches, because, again I do not have all the creative genius that so many of you bloggers have to make anything out of a piece of gum and a scrap of paper. So, it is not my first instict to think how I can just find something free to use. However, the craft store just did not have branches that I wanted and the ones they did have were expensive. Then, it occured to me that while this is Arizona and maybe a desert, we do have trees here. Lots of them. I can go get my own branches from an actual tree!

This became, what I assume, was a hilarious picture of my daughter and I running through the park trying to find a tree with low enough branches for us to snag. Which then turned into me boosting her into trees and there may have been some unsteady boosting which led to falling and scraping and my sweater and hair being covered in little burrs. You know, these things:


After what seemed like an hour, but was probably more like 15 min, we left the park with one branch. One. Measly. Branch. Later that same day, on a walk around the block with the family, we found atleast 3 more perfect branches just laying around next to the sidewalk. Do you see why I just go to the craft store? You see?

Once I had the branches the rest was a piece of cake.

I used very simple heart shapes cut free hand from newspaper in different sizes. I also cut hearts from red construction paper and glued them to the center of the newspaper hearts. I simply taped the hearts to the ribbon and tied the ribbon around the branches. I would have preferred twine or something other than the red curling ribbon. It would have laid much nicer, the ribbon kind of "curls" up. Duh. But it was what I had at home, so I'm going with it.

Now, I have one decorated item sitting next to a bunch of junk on my beautiful buffet entry table. I have some other valentine ideas for the table, so hopefully, I'll be posting pictures soon of the whole decorated table. Sans junk.


Thanks so much to Stay at Home Nation for featuring my tree!


Stay at Home 

Nation

Monday, January 16, 2012

Pantry Progress

Pantry Baskets - Dollar Store Style

I want to start my pantry update with a fun project I have finished this week. My baskets. These are dollar store baskets that happened to come in this bright pink color and I happened to want them to be blue. So, I spray painted them. Like this:


Then I found some little brown paper hanging tags at Michaels (the white labels were also painted for a different part of the pantry - see, now you have to come back to find out more):


and spray painted those with chalkboard paint. I bought a pack of "chalkboard ink" markers to write on my new chalkboard tags. Hung them on my baskets and now I have this:


Now, for the rest of the pantry. Let's start with our before picture:


See my pink baskets before? Halfway falling off the shelf.
Here it is all emptied out:


Here is a close up of some nasty stain of some sort on the back wall. This is what it looks like after cleaning it. Ugh!


Notice the lovely contact paper. It is now a permanent part of the shelf seeing as it was so securely glued into place, I was completely unable to remove it. So, I painted over it. I'm sure this is a major painting no-no, but just wait to hear about all of my other painting faux pas, contact paper was the least of my worries.

And here is a picture of those ugly accordian doors I mentioned before:


The shelves have been painted (perhaps, not in the most ideal of ways, but they are done and look great and I can't wait to share them). Of course, my kitchen looks like this during the process:


I just keep telling myself (mostly my husband) this is progress, even if it looks like our kitchen exploded. :)

So glad to be working on this "Impossibilities" challenge! It has inspired me to aim higher and do more. I'm already thinking of my next projects!


~Jess


Linking up with:
Pink Hippo Party

Shine Your Light