Powered by Blogger.

Tuesday, September 11, 2012

Remembering...


We all have our story of where we were when we heard the news of September 11th. Most can vividly recall the terrifying feelings of shock, fear, despair, disbelief. And for those who lost loved ones on that day, the remembering means something different.


I was a relatively new mom at the time. I had just started a new job, had a baby boy just under 2 years old. I was asleep in bed with our little guy as he had woken me so very early that morning and I was able to convince him to lay down in my bed and let mommy rest. The phone rang and it was my husband calling from work. He worked overnights and had only been in the News business a very short time. He was watching it all unfold and needed to call us. I turned on the t.v. and sat and cried. I was stunned and motionless and alone.

As the day went on, I called work. Do I work on a day like this? Would the state buildings I go to be open? I ultimately decided to cancel my appointments (which I later got in some big trouble for and have always wondered if that CPS Case Manger ever felt like a schmuck for coming down on me for cancelling work on 9/11).

I have family in New York and my thoughts almost instantly went to them. Were they ok? Were their friends, co-workers, neighbors ok? My uncle, at one time, worked in one of the World Trade Center buildings. Was he there that day? Were his colleagues and friends? Eventually, all of those questions were answered. And my family was all ok.

As the years have passed, I've thought about how fortunate I was to have an opportunity to see the WTC in person and to go to the observation deck and the pictures I will always have of that trip.


In many ways, New York City has always held a special place for me. It's a city I have traveled to very few times in my life, but it's a city I feel connected to through family. My dad was born and raised there (moving to Phx as a teenager), my grandmother, several aunts, uncles, great-aunts, cousins all still live there and have lived there their whole lives. They are New Yorkers and I am always struck by how apparent that is each time I see them. And in the days, weeks, months after 9/11, I felt the sense that as a nation, we all felt like New Yorkers for a little bit.

The feelings of unity, brotherhood and community were overwhelming. We, as a nation, were family.


Some of our family members had been deeply wounded, searching for loved ones, hoping and praying for survival.


Many in our family had died, taken from us unfairly, too quickly and out of hatred.


Some in our family lay down their own lives for each other.


As a family, we mourned these losses together


Several years after 9/11, in 2008, I traveled to NYC. This was the first time I learned of the Little Chapel that Stood. St Paul's Chapel is right across the street from Ground Zero and as buildings around it were falling and debris was flying, the little chapel came away unscathed, not even a broken window.


And that chapel became the space where rescue workers came for a hot meal, to rest, to change their boots and to pray.


People worked around the clock in an effort to rescue anyone they could. Members of the community brought meals, clean clothes, and a shoulder to cry on to support those rescue workers.


The fence around the yard of the church became a memorial.


Today, as I am remembering 11 years ago, I am struck by how moved people were to give of themselves in so many ways, how we became family through tragedy, how we were able to put aside petty differences for the greater good. And while, 9/11 will always be marked by tragedy, death and sorrow, I am reminded that so it is, also marked by Family and Hope.




Thursday, September 6, 2012

Experimenting with New Frosting


I tried out 2 new frosting recipes recently, both very different from each other. I like to have some other options besides the standard butter and powdered sugar buttercream frosting that I typically use.

In searching for a frosting that could hold up to being in the heat for a period of time (I have a late September outdoor wedding in AZ that I am making a cake for and need some frosting that wont slide off the cake in all that heat), I came across IndyDebi's buttercream recipe that got great reviews for holding up well in heat and humidity for long periods.

Indydebi’s Crisco-Based Buttercream Icing:

Ingredients:

•1-1/3 cups Cricso
•1/3 to 1/2 cup milk, depending on consistency needed
•3 Tbsp powdered Dream Whip (*)
•2-3 Tbsp clear vanilla, depending on your personal taste
•2 lbs powdered sugar
•(*) A powdered whipped topping mix made by Kraft Foods, usually found in the cake/sugar aisle in the grocery.


Instructions:

There’s no wrong way to mix this. I usually mix all but the powdered sugar for a minute or two, then gradually add the sugar, but the only reason I did this was to avoid the “sugar-splash” factor. The longer the mixer runs, the smoother it gets. Sifting the powdered sugar before blending helps with smoothness but is not necessary.


In addition to the vanilla extract, I also added butter flavoring since this is made with Crisco instead of butter. I used 1/2 cup milk and it was still very, very thick making it a little difficult to spread. I think next time I will add a little more milk to thin it out a bit because it was a little hard to work with.

Here is the cake I used this frosting on:


The Verdict:

It did hold up really well, so it definitely will be the recipe I use for the upcoming wedding cake. It crusted nicely and made a good base to lay the fondant on. As for the taste, this is harder for me to assess. Although I love to make cakes, cake and frosting are not my favorite things to eat. I'm the person that scrapes all the frosting off to the side and just eats the cake. One downside to this recipe is that it has the "mouth feel" (is that a saying?) of shortening rather than butter. It tasted good, but it tasted like frosting, and well, I don't like frosting :) But, everyone that ate this cake said they liked it.

The next frosting is like the exact opposite of the first one. It's more like a whip cream frosting, very light, very easy to spread and not the frosting you would want to use in heat and humidity. It uses a heated milk and flour mixture, which is kind of interesting.

Ingredients:

5 Tablespoons Flour
1 cup Milk
1 teaspoon Vanilla
1 cup Butter
1 cup Granulated Sugar (not Powdered Sugar!)

Directions:

Bake your favorite chocolate cake and let it cool.

In a small saucepan, whisk flour into milk and heat, stirring constantly, until it thickens. You want it to be very thick, thicker than cake mix, more like a brownie mix is. Remove from heat and let it cool to room temperature. (If I’m in a hurry, I place the saucepan over ice in the sink for about 10 minutes or so until the mixture cools.) It must be completely cool before you use it in the next step. Stir in vanilla.

While the mixture is cooling, cream the butter and sugar together until light and fluffy. You don’t want any sugar graininess left. Then add the completely cooled milk/flour/vanilla mixture and beat the living daylights out of it. If it looks separated, you haven’t beaten it enough! Beat it until it all combines and resembles whipped cream.

Grab a spoon and taste this wonderful goodness. If there is any left after your taste test, spread it on a cooled chocolate cake.

Cut yourself a piece and put it on a pretty plate. Grab a fork and prepare to experience the most divine pairing you can imagine. This frosting on chocolate cake is to die for. Sure, the recipe sounds strange — it has flour in it — but it’s sublime. Try it, you’ll see. You’ll love it so much you won’t go back.


Here is the cake I used this frosting on:


The Verdict:

I liked the really light consistency of this. It wasn't too sweet, which would be perfect on a really sweet cake. It had a good flavor and didn't have that heavy buttercream quality. It was super easy to spread, but definitely not the best frosting for decorating a large fondant covered cake, like the one I did. I think it would be a perfect cupcake frosting though. My daughter who likes the piece of cake that has the most frosting (and will even eat the frosting I scrape off), loved this frosting.

There you go, 2 different frostings as an alternative to your everyday buttercream.

Enjoy :)


Linking up here:

All Things Homie
KitchenFun
Liz Marie Blog
Chic on a Shoestring Decorating
SixSistersStuff.com

Sunday, August 26, 2012

Cheesy Chicken and Rice


This is another Pinterest recipe. You can find the original at Southern Plate.

I thought it was a good start to a recipe, but it was a bit bland for me. The recipe says to place 4 boneless, skinless chicken breasts in the crock pot, top with one chopped onion, then spoon 1 can cream of chicken soup over the top. Cover and cook on low for 7-8hrs or high for 3-4hrs. Then add 1 can corn and 1 box yellow rice and 1 cup shredded cheese before serving.


Now, when I was assembling this, I did not like dumping these ingredients in with no seasoning. I just never cook like that. I season everything. But, I wanted to try it as is first.

And the finished product was, well, bland. Also, I found the chicken to rice ratio to be a little heavy on the chicken. This could just be me, but I really liked the yellow rice (I had never tried it before) and wanted there to be more of it.


Lastly, I doubled the cheese (the original recipe calls for 1 cup, I put in 2 cups) and I still tasted NO cheese. Now, if you are going to call something "cheesy" in the recipe title, I need to actually taste cheese. I don't know. I'm a stickler like that.

So, here are the changes I made and liked it much better:

4 boneless, skinless chicken breasts
1 onion, chopped
1 can cream of chicken soup
1 can diced green chiles
salt, pepper, garlic powder to taste
2 boxes Zatarains Yellow Rice
1 can whole kernel corn
4 cups cheddar cheese, shredded

I put the chicken at the bottom of the crock pot, seasoned with salt, pepper and garlic powder. Use less salt than you usually do b/c the cream of chicken soup and the yellow rice have added salt.

Top with chopped onion, can of green chiles (the small can) and spoon soup on top of that. Put the lid on, cook on high for 7-8 hrs.

With the last few minutes of cooking, add can of corn, cooked rice and cheese. Stir it all in and let warm through and melt cheese.

The green chiles added extra flavor, but was not spicy. I love green chiles, but if they are not your thing, you could do a can of diced tomatoes or chop up some bell peppers or something. I just think it needs some kind of extra flavor.

I also sprinkled cheese on top before serving. You know, the "cheesy" thing.


Enjoy!


Friday, August 24, 2012

Salted Caramels


The best part about these cute little chewy, tasty treats is that I made them in the microwave.

I found this on pinterest. The only change to the recipe that I made was to add vanilla extract and sea salt.

It heats up in 7 min in the microwave and no thermometer needed. Way cool!

Ingredients:
1/4 cup butter
1/2 cup granulated suger
1/2 cup brown sugar
1/2 cup light Karo syrup
1/2 cup sweetened condensed milk
1/4 tsp vanilla extract
sea salt


Directions:
Combine all ingredients in a microwave safe mixing bowl.


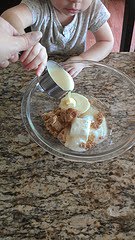
I had little helpers :)

Heat in microwave (at full power) for 7 min, stirring every 1.5 to 2 min. Stir in vanilla extract.


Pour hot mixture into buttered 8x8 baking dish, sprinkle with sea salt immediately and cool in refrigerator about 20 min.


Cut the caramels into squares and wrap in wax paper. To cut these, I sprayed the knife with cooking spray and used an up and down motion rather than trying to pull the knife through the caramel.

I needed to clean the knife and reapply the cooking spray a couple of times. Cutting was significantly easier in the beginning, but about half way through, the caramel got very stretchy and came out more like globs than nice squares. Since, I was wrapping them, the shape didn't matter as I was rolling them into little logs anyway. If you weren't wrapping these and wanted to present them a different way, you'll need to work very fast or maybe put them back in the fridge halfway through to keep them looking neat.

Good news is, the caramels easily came out of the pan, no mess at all.


This made about 45 caramels, but as you can see in the picture, I wasn't very consistent with the size of them and some were way too big, so this recipe could probably make a few more.

They turned out just as good as any stovetop-constant stirring til your arm falls off-candy thermometer requiring-caramels, in my opinion. And they were super easy!

Some of the caramels did stick to the wax paper for some reason. I'm not sure why some did and some didn't. It wasn't terrible, just required a little extra peeling off of wax paper. I thought about maybe spraying the paper squares with cooking spray before wrapping, but I think that may make a greasy mess. Maybe wrap them in cellophane instead? I don't know.

But I like the look of the wax paper wrapped candies in this vintage-y blue candy dish.


Enjoy!


Linking up with these great parties (they're kind of a big deal):

SixSistersStuff.com


Too Much Time On My Hands

{nifty button}

One Artsy Mama
Pink Hippo Party


Tuesday, August 14, 2012

Bacon and Cheese Egg Toast


I have seen this called "Egg in a Hole" and "Egg in a Basket".

It's a super simple recipe that I just changed up a bit by adding some bacon and cheese.

Simply cut a hole in the middle of your sliced bread. I used whole wheat sandwich bread, but you could use any kind of bread. A big thick Texas toast would be good for this recipe.

I sprayed the baking sheet with cooking spray, buttered the bread and cut out a hole (use a cookie cutter, biscuit cutter, or free-hand it).


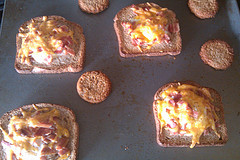
Crack the egg in the hole, sprinkle salt and pepper over the egg, top with cooked, crumbled bacon and some shredded cheddar cheese. Pop it in a 400 degree oven and watch closely until it is cooked to your liking.


I baked the piece that was cut out (and also buttered) as well. The idea is to cook the egg sunny side up and use the extra piece to dip in the runny yolks. I, however, baked this until the yolks were hard. You can see in the pic it is quite toasty. Since I was serving this to kids, it was less messy than runny yolks, but really it should be cooked less than I did here.

Serve it up and watch your kids ponder how the egg got in there :)

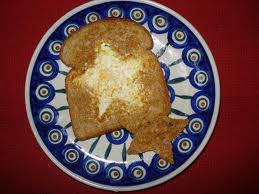
What I should have done was make fun shapes like this:


Enjoy!


Tuesday, August 7, 2012

Kids "Sushi Bento" Lunch Box


For my daughter's first day of 5th grade, I decided to make her a surprise lunch. She loves sushi and her and I enjoy having girl's sushi night out since the boys in our house are not big fans of sushi. So, her lunch was a sushi themed bento box :)


These are tortilla pinwheels made with spinach tortillas, ranch cream cheese, turkey and olives (Amelia loves olives).


On the side, are cucumber rolls (cucumber slices rolled around sticky sushi rice and carrot sticks) and fruit skewers (green grapes and blueberries).

The sushi rice was from Alton Brown's recipe (from Food Network):

Ingredients
2 cups sushi or short grain rice
2 cups water, plus extra for rinsing rice
2 tablespoons rice vinegar
2 tablespoons sugar
1 tablespoon kosher salt

Directions
Place the rice into a mixing bowl and cover with cool water. Swirl the rice in the water, pour off and repeat 2 to 3 times or until the water is clear.

Place the rice and 2 cups of water into a medium saucepan and place over high heat. Bring to a boil, uncovered. Once it begins to boil, reduce the heat to the lowest setting and cover. Cook for 15 minutes. Remove from the heat and let stand, covered, for 10 minutes.

Combine the rice vinegar, sugar and salt in a small bowl and heat in the microwave on high for 30 to 45 seconds. Transfer the rice into a large wooden or glass mixing bowl and add the vinegar mixture. Fold thoroughly to combine and coat each grain of rice with the mixture. Allow to cool to room temperature before using to make sushi or sashimi.

This was very easy to make and the rice was really tasty all by itself. It's perfect for any recipe that may call for sticky rice.


The dessert sushi were Little Debbie blueberry creme rolls sliced and rice krispy treats with swedish fish and fruit by the foot to resemble sashimi.

The chopsticks are stainless steel chopsticks that I found at Lee Lee's (local Asian supermarket).

It was super fun to make, but far more time consuming than packing school lunch should ever be. It's Pb&j the rest of the year :)


"To my favorite sushi partner: Have a great first day of 5th grade! Love you, Mom"

Happy back to school everyone!


Linking up at these fabulous places:

Tuesday To Do Party

UndertheTableandDreaming
I Heart Nap Time


Monday, July 16, 2012

Salad Bar Night


I love salad bars. Our kids all love salad bars too. But I don't love salad bar prices. So, we had a salad bar at home instead.

It was fun for all of us to be able to put together our own salads (just like at the salad bar). Our 6 y.o. foster daughter said it was her favorite day and I thought my salad was as good as any $8 salad I've had.

Obviously, there is no recipe here. Just put out all the stuff you like in your salad and go at it. Most of the things I used were canned or produce that required no cooking, just wash and your done. I made hard boiled eggs and homemade ranch, that was the extent of my cooking.

I won the prize for using the most items in my salad (I'm sure this had nothing to do with me being the one putting the salad bar together).


Kidney beans, garbanzo beans, olives, green bean salad, grape tomatoes


Cheese, pickles, beets, hard boiled eggs, cottage cheese(not pictured), bacon bits, croutons, assortment of dressing (including homemade ranch).


I love making ranch at home. It's super easy and tastes so much better than anything you can get in a bottle.

There really isn't a recipe as it is all done to taste and personal preference. But, here's how I make it:

*1 part mayo (any kind - light, fat free, olive oil mayo, whatever)
*1 part sour cream (any kind - light, fat free)

(if you like a more sour flavor, change the ratio to more sour cream than mayo) If I were not using equal parts, I'd use more mayo than sour cream but that's my personal preference.

*Milk (any kind) to thin to your preference. If you like a thick ranch, use less milk, more milk for thin ranch.

*Salt, pepper, garlic powder, onion powder - to taste

In this recipe, I actually use real measurements for a thin ranch coleslaw, if you must measure.

This was perfect for our large family and would be good for a get together. I imagine there would be tons of leftovers for a smaller group though. What would you put in your salad bar?