Powered by Blogger.

Thursday, January 17, 2013

DIY Household Cleaners


For my Clean and Organize 2013 Challenge, I have put together my cleaners all in one place, easy to take from room to room when cleaning.

Here are the cleaners I use:

* 50% Vinegar, 50% Water - in a spray bottle

* Baking Soda - I put it in a shaker I found at the Dollar Store (looks like the ones used in restaurants for parmesan cheese)

* Tub/Shower Cleaner - in a spray bottle (I posted about this cleaner here)

* All-Purpose Cleaner - in spray bottle (recipe below)

* Window/Glass Cleaner - store brand

* Sponges

* Microfiber cloths and/or rags

* Small brush (mine is a grout cleaner, I believe, but you can use an old toothbrush)

* Swiffer Duster (I forgot to include this in the picture, but I do keep it in this bucket as well)


Ever since I made my own laundry detergent, I have been trying out different recipes for homemade cleaners as well (I've also, very unsuccesfully, been experimenting with homemade shampoos and body washes - someday I'll get it).

I posted about the Tub/Shower cleaner here and have continued to use it ever since. I primarily use it for the tub and shower (duh), however, it works well on greasy areas (like the oven hood). You really could use it on all of your surfaces, but it isn't necessary and it's more expensive than just vinegar and water or vinegar and baking soda. It is also soapy and foamy and takes a little more effort to rinse clean.

I use the vinegar and baking soda combo when I need a little more scrubbing action. I just sprinkle the baking soda over the area, then spray the vinegar solution, let it fizz, then scrub it off. You can use this combo on just about anything (even carpets), but baking soda is abrasive, so don't use it on surfaces that should not use abrasive cleaners (i.e. glass top stoves).

I've recently tried a new recipe for an all-purpose cleaner:

1 cup Water
1 cup Vinegar
4 Tbsp Lemon Juice
15 drops Tea Tree Oil

Tea Tree oil is a germicide, fungicide and anti-bacterial. The vinegar also kills mold, germs and viruses making this cleaner especially useful during the cold and flu season for wiping down door knobs and light switches.


You can use this cleaner the same way you would the vinegar and water solution. I kind of like the smell of the tea tree oil after cleaning, where sometimes the straight vinegar smell bothers me(although, it does dissipate quickly).

I have not yet tried out any homemade window cleaner recipes which is why I just have a store bought window cleaner in there.

All of my spray bottles are from the dollar store (similar bottles are $4-5 at Target). You may also notice that they are all less than half full. I do this because my kids are a little heavy-handed in their use of cleaners, so if the bottle isn't full, there is less for them to waste. Feel free to fill your bottles if you don't have this problem :)

Alrighty. All ready for cleaning!

Clean and Organized 2013 Challenge


Linking up here:

All Things Homie
Somewhat Simple


Tuesday, January 15, 2013

New Hampshire Bread and Butter Pudding


This was our dessert in New Hampshire on our Food Tour. This recipe comes from Candlelite Inn Bed and Breakfast in Bradford, NH.

Ingredients:

1/3 cup raisins
5 smalll rolls, cubed, toasted
1/2 cup butter, melted
2 eggs
2/3 cup sugar
2 cups milk
1/2 tsp vanilla
1 tsp cinnamon, divided

Directions:

Preheat oven to 375 degrees.

Grease a 1 quart casserole dish (I used butter), line with raisins. Dip bread cubes into melted butter and arrange on top of raisins.

The recipe called for 5 slices of stale bread, I used little rolls I found in the bakery instead. I cubed them up, then toasted them (since they were fresh, not stale).


The recipe calls for 1/4 cup melted butter, but that was not enough to dip each piece of bread, so I ended up using 1/2 cup butter instead (this may be because I used rolls instead of sliced bread and may have ended up with a lot more bread than I was supposed to).


Beat remaining ingredients (except 1/2 tsp. cinnamon)


I used 1 1/2 cups milk and 1/2 cup half and half (I had a 1/2 cup left over from the Corn Chowder and wanted to use it up).

Pour mixture over bread and press down a little to make sure all of the bread soaks up the liquid. Sprinkle remaining 1/2 tsp cinnamon over top.


Place casserole dish inside a pan of hot water and bake at 375 for about 45min.


It was delicious!

Check out our New Hampshire Corn Chowder recipe, before heading to Vermont!

Food Tour USA


Linking up here:
All Things Homie
Somewhat Simple


New Hampshire Corn Chowder


New Hampshire is the second state on our Food Tour and was a little more difficult to find a specific food that it's famous for. New Hampshire and Vermont shared a lot of the same foods as did all of New England. We saved maple syrup for Vermont (hint for next week's recipe). I came across a corn chowder recipe at Our Grandmother's Kitchen and decided on that for New Hampshire.

Ingredients:

5 pieces bacon
1 onion, finely chopped
1 red bell pepper
3 cloves garlic, minced
1 1/2 lb small red potatoes, quartered
5 cups corn (or 3 cans)
4 cups chicken stock
2 cups water
salt and pepper
1 1/2 cup milk (or 1/2 and 1/2)
green onions for garnish

Directions:

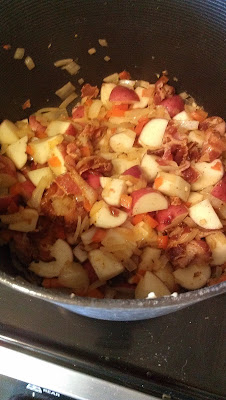
Brown bacon pieces in large pot, drain on paper towels, pour off most of the bacon fat, leaving a small amount to sautee vegetables in.

Sautee onions in bacon fat, then add peppers and garlic until soft.


Add potatoes, toss to coat.


Add corn, broth and water, bacon pieces and pepper (wait to add salt at the end). Bring to a boil, cover and reduce heat, simmer 30 min.


The original recipe said to use bacon pieces as garnish and to use all of the bacon fat in the soup. I opted to strain off almost all of the bacon fat, but add the bacon pieces into the soup, rather than use as garnish. However, if you want crispy bacon, wait to add it at the end instead.

Puree soup in small batches (hot liquid expands in the blender, so be sure to keep the middle piece of the blender lid off to let out steam). The original recipe calls for puree-ing 1/3 of the soup. I did more than half because I wanted a smoother soup. My family was fighting over the big potato pieces, so maybe leaving more chunks would have been better :)


Add pureed soup back to pot, add milk (I used half and half) heat through, but don't boil. Add salt to taste.

*Since I was cooking the bacon in the soup, I wanted to wait to add salt at the end so as not to over salt it. If you are using bacon as a garnish, you could add salt at the same time as pepper (before cooking for 30min).

Garnish with green onion.


This was the perfect week for a warm, comforting soup as it has been absolutely FREEZING here this week.

I would definitely make this again and everyone loved it and went back for more. I think something a little spicy (like some jalapeno) would be a nice addition (but not very New Hampshire-esque).

For dessert in New Hampshire, we had Bread and Butter Pudding(very much worth checking out!).

Food Tour USA

Next Stop: Vermont


Linking up here:

All Things Homie
Somewhat Simple


Thursday, January 10, 2013

Cleaning the Garbage Disposal


The first cleaning task of my Clean and Organized Challenge is the garbage disposal. Check out the post from Clean and Scentsible about cleaning the "garburator" (That makes me laugh. I've never heard it called that before :) and the microwave.

Start by running the disposal quickly to clear out any food that may be in there. Then, pour some baking soda and then vinegar and let sit (and listen to the fizz :), then run the disposal with hot water to help loosen anything that may be stuck on there. Use an old toothbrush to clean the under side of the rubber guard over the disposal. Food that gets stuck under there can cause it to smell.

And that's all you need to do to clean it. Vinegar is a germ killer and a deodorizer, but if you like to use another method for deodorizing in addition to the vinegar, run some citrus rinds through there.

Here's what each of these things do for your garbage disposal:

1.Lemon/Limes/Oranges – Place a couple halves of lemons or limes in the garbage disposal and process them through. The acid from the citrus will remove the odor and leave your disposal smelling much fresher. The oils from the rinds will also freshen it up, so you don't have to use the whole fruit.

2.Baking Soda – Baking soda is well known for its odor absorbency and can be added to other items being processed through the disposal to aid in odor removal.

3.Vinegar Ice – Fill an ice cube tray with vinegar and freeze. Place a couple of ice cubes in the disposal and process with cold water. Be sure to label the remaining cubes or someone may get a surprise in their beverage!

4.Ice/Salt – Place some ice in the garbage disposal and sprinkle with rock salt or 1 cup of vinegar. Process the ice through the disposal with plenty of cold water.

I've read in several places that ice in the garbage disposal helps to keep the blades sharp, so #3 and #4 would work for that.

Today, I decided to try frozen lemon rinds.


There was a crazy sale on lemons at the Farmer's Market, so I made lemonade. I didn't want to just throw away all of those lemon rinds, so I froze them. Today, I ran them through the garbage disposal to freshen it up and sharpen the blades. I only used a handful, so I still have several in my freezer for next time it needs freshening up :)


Linking up here:

Liz Marie Blog
One Artsy Mama
KitchenFun

Chic on a Shoestring Decorating

Clean and Organized 2013 Challenge


As you know from many of my posts, I am always on a quest to be more organized. Many times that quest involves a lot of wishing and hoping and looking at pinterest, but not a lot of doing. Well, that's kind of me :)

So, for 2013, I have resolved to get clean and organized and, of course, blog about it. Now you may remember that in 2012, I had a similar goal. So nice of you to notice. It's true. And the reality is, it will likely be my goal in 2014 too. But, let's not forget 2012 was not all a wash in this area. I did actually get some organizing projects done and they are still working for me today!

My Kitchen Pantry came as a result of another blogger's challenge and it has remained organized and functional even a year later.


I also made a kitchen drawer into a School Lunch Station. Ok, yeah, so that was in 2011. I guess I do about 1 organizing project a year. But, we still use that lunch station and it still looks clean and organized.


I swapped out the bigger white utensil baskets for smaller black baskets and added one for straws (not so much for school, but because I like to use straws a lot around the house).

Now those white baskets are in my pantry holding boxes of jello and dry mix packets. The skinny black baskets just worked better for the utensils.

Onto this year's challenge:

Clean and Scentsible is hosting the Household Organization Diet which is the total inspiration for my challenge. She is having us focus on one area of the house each month. January is the kitchen.

Before starting the challenge, she had us make a binder with 13 tabs (one for each month and one for notes). So, here is my binder:


Cheapest 1 1/2 " binder at Staples


Slide in my little cover page and add some tabs


And there it is. I kept my tabs blank at this point because I am not completely sure if I will organize my binder in the same way she does. I want to play around with it and decide on the best system for our household, so they are blank for now. I'll keep you posted on my binder progress as I go.

To get started, Clean and Scentsible also had us get our cleaners organized. Check out mine here.

Kitchen Projects for January::

Clean and Organize under the kitchen sink
Clean Garbage Disposal
Clean and Organize Kitchen Cabinets
Clean and Organize Refrigerator
Organize the Junk Drawer
Tile Floor Face Lift


Linking up here:

Liz Marie Blog
One Artsy Mama

Chic on a Shoestring Decorating

Monday, January 7, 2013

Maine Blueberry Muffins


Since Maine is a big producer of blueberries, several of the Maine recipes I came across included blueberries. So, naturally, we had to have some blueberry muffins on our Food Tour while in Maine.

This recipe came from the Swan House Bed and Breakfast in Camden, Maine.

They were super easy and super tasty!

Ingredients:

1/2 cup butter, softened
3/4 cup sugar
2 eggs
1 tsp vanilla
1/2 cup milk
2 cups flour
2 tsp baking powder
1/2 tsp salt
1/2 tsp cinnamon
2 cups fresh blueberries
cinnamon/sugar for topping

Directions:

Preheat oven to 375 degrees.

With electric mixer, cream butter and sugar


beat in eggs, vanilla, and milk.


The wet stage of this recipe came out kind of strange for me. I almost tossed it and started over because I thought I messed up a step or something. I didn't have enough eggs to start over, so I just kept going and they turned out wonderful. So, if the wet ingredients don't seem right to you, if you followed these directions, it'll turn out great.

In a separate mixing bowl, combine flour, baking powder, salt and cinnamon.


Stir wet ingredients into dry ingredients by hand (not mixer). Stir until all ingredients are incorporated. Fold in blueberries.


Fill lined muffin tins to the top. Sprinkle tops with 1/3 tsp. cinnamon/sugar mixture (the original recipe says to bake, then brush tops with butter and sprinkle with cinnamon/sugar. I just did it before baking instead). Bake for 27 min until tops are lightly browned.

If you can stand it, wait until cool before stuffing in your face. And, if you're like my son, you'll think these are great dunked in milk.

Be sure to check out our other Maine recipe on our Food Tour USA stop in Maine.

Food Tour USA


Linking up here:
Tuesday To Do Party
Lil\'Luna

All Things Homie
Somewhat Simple
Liz Marie Blog
One Artsy Mama
KitchenFun

Chic on a Shoestring Decorating